Group tool: Self Enrolment
The Group Self Enrolment Tool was built by the TU Delft to facilitate the self-enrolment process. By using this tool, Instructors and Course Managers are able to set up a self-enrolment process for students, monitor the entire self-enrolment process and push the student self enrolments to Brightspace to form permanent groups.
You can now also make self-enrolment groups with the Brightspace group tool. Our advice is to only use the Group Self-Enrolment Tool when you want to have self-enrolment groups of various sizes or when you want to have a waiting list.
Each group in Brightspace has a maximum capacity of 200 participants and is restricted to 200 groups per category.
-
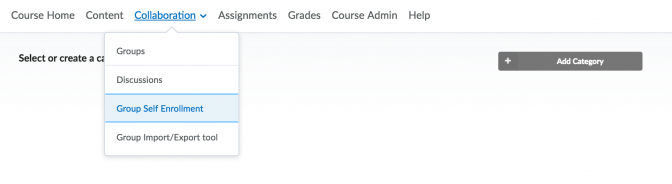
- Go to Collaboration and select Group Self Enrolment.

- Click on +Add Category to create a new group category.
- Type in the name of the category.
This will be the category students will see later on when self-enroling in the groups. - When you are done, click OK.
- Below a new window will open where you can fill in more information concerning the self-enrolment in this category.
If you make any changes, they will be saved, and next time you can continue where you left off.
There are two ways to create groups (A) by manually creating groups or (B) by uploading a .csv file. See below.
-
To manually create groups within the Self Enrolment Tool, follow the following instructions:
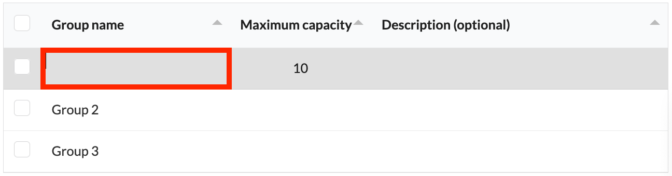
- Add/create a new group by filling in the Group name (this is required), Maximum capacity (this is required) and a Description (this is optional). You can do this by clicking on the row underneath the heading of the column you wish to edit.
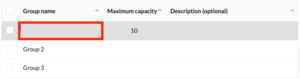
The maximum length of the Group name is 125 characters. If this is extended it will cause problems when trying to push the groups to Brightspace.
The description field is not pushed to the Brightspace group tool.
- To add an additional group to the category, click on Add another group.
- In case you’d like to reuse the information you’ve just created, click on Download this table and save it as a .CSV file. This can be helpful for instance if you are creating another group category with the same group details.
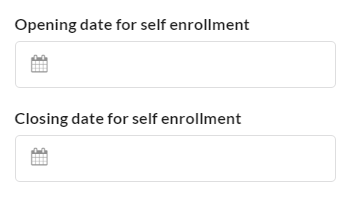
- To set up a start date and end date for self-enrolment, add the date by using the calendar on the left side of the menu. This setting applies to all groups in the category, meaning you cannot set individual deadlines for each group in a category.
- Check the box Allow students to join more than one group if you wish to make this option available.
-
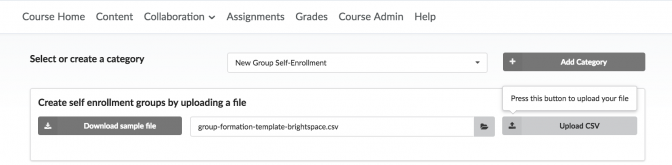
Instead of manually creating groups within the Self enrolment tool, you can add all this information by uploading a .CSV file.
- Under Create self-enrolment groups by uploading a file you can download and save the sample .CSV file by clicking on Download sample file.
- Open this file in Notepad or Excel. Now, you will see an example of how the file should look.
- You can edit this file with the information concerning your group(s). Add the Group name, Maximum capacity and Description.
The maximum length of the Group name is 125 characters. If this is extended it will cause problems when trying to push the groups to Brightspace.
The description field is not pushed to the Brightspace group tool.
- Save it as a .CSV file.
- Go back to the Group self-enrolment menu, select a CSV file from your computer you saved previously and upload it by clicking upload CSV. The group names, capacity and description will now appear in the group list.

If you are satisfied with the group setup, you can click on Activate self-enrolment to activate the group function. In case you have set up a self-enrolment date, you then have the possibility to make any changes to the group until this set date. Click on Setup again in case you wish to do so. In case you’d like to make your groups available for self-enrolment immediately and overwrite the starting date, do this by simply clicking on Activate now.
Once a self-enrolment has been opened, the groups can no longer be adjusted. You must first push the groups to Brightspace and adjust groups using the Brightspace Group Tool (Course menu > Collaboration > Groups). Note that not all the regular Brightspace Group settings are available.
The pushed groups automatically get the type of “# of groups, no Auto Enrolment”. This means that any adjustment of group size/number will have to be done manually for each student that needs to be added/changed and each group that needs to be adjusted. The capacity settings from the Group Self Enrolment tool are not visible once the groups are pushed to Brightspace so take note of them beforehand or use the logs.
-
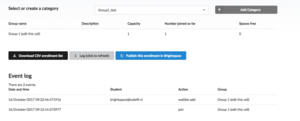
You can check and monitor your self-enrolment groups by returning to the Group Self-enrolment menu and by selecting the category you’ve created previously with this tool. When a self-enrolment process is active and students are self-enrolling, you can click on the Log button on this page, to see who has enrolled in which group and when.
-
In case a group is full, any students that click on a group to enroll will automatically be placed on the waitlist. If a previously enrolled student unenrolls from the group, the first student on the waitlist will be promoted to the group(s). He/she will be notified by email that this has happened.
There is no way to turn the waitlist feature off and only Instructors, Course managers or Teaching Assistants can see if students have been placed on the waitlist in the log. Waitlist enrolments do not show up in the numbers.
-
Once your groups are made and students have self-enrolled, it is possible to make these groups final by adding them to the Brightspace default group tool.
- To do this, go to the Group Self-enrolment tool;
- Select the group category you wish to process;
- Check if the enrolments were successful and if there are any groups that have filled up completely. If so, this could mean that students might have started forming a waitlist for the groups that are full.
- Download the enrolment log by clicking on Download CSV enrolment list. This will contain all the information on who enrolled in which group.
If you need to know at a later time, who was in which position on the waitlist for the groups, you need to use Download CSV enrolment list file before publishing the group. Once you have published this enrolment data in Brightspace, you will no longer have access to the enrolment log and subsequent waiting list enrolments.
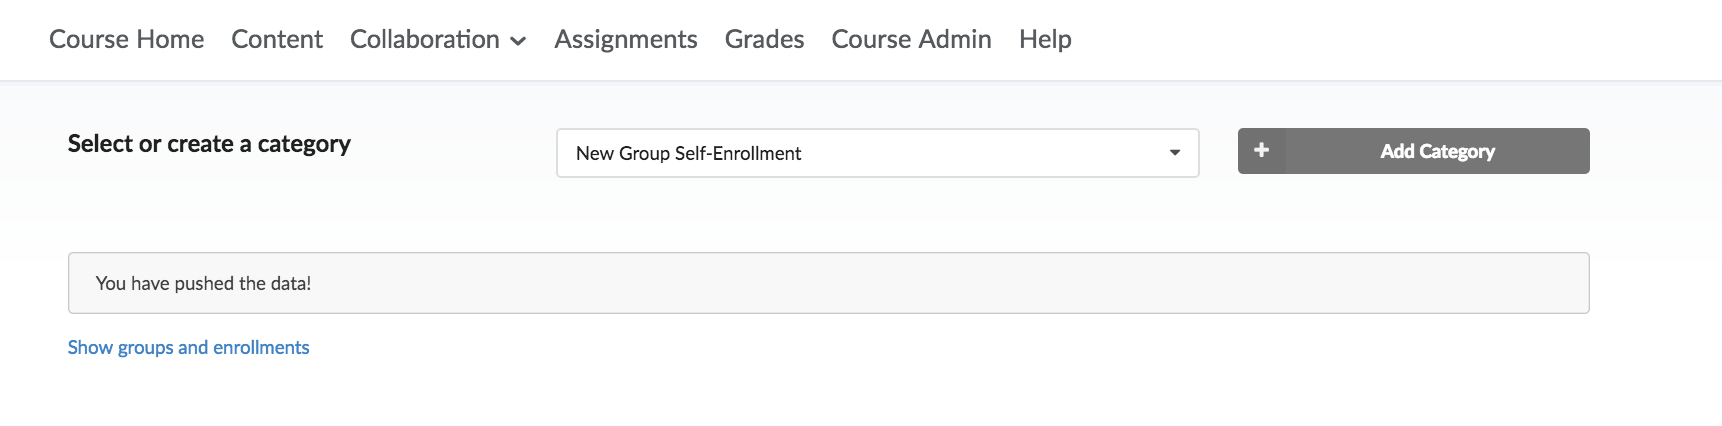
Also important to note is that once the enrolment time has passed or the instructor has pushed the enrolments to Brightspace, students can no longer unenroll themselves from groups. Similarly, it won’t be possible for students on the waitlist to be promoted to the group in case someone quits. In this case, it might be helpful for the instructor to keep the log file, to determine who is the first in line to be promoted to the group.- Click on the Publish this enrolment in Brightspace button to push and thus, finalize the group enrolments in Brightspace. After a few seconds, you’ll receive the message ‘You have pushed the data’. This means the process is complete.
Publish this Enrolment in Brightspace without having any students yet. Currently in The TU Delft Group Tool – Group Self Enrolment if you click Publish this Enrolment in Brightspace before all students are enroled, the group gets automatically published under Collaboration > Groups and the category type reverts from Self-Enrolment to # of Groups – No Auto Enrolments.
- Click on the link Show groups and enrolments to see your groups in the Brightspace Group tool. Select the group category you’ve created previously. (The number of students enroled per group should be the same as in the Self-enrolment menu before you’ve pushed the data.)
- Now you can adjust the configuration of your group in Brightspace. Imagine you’d like your group to have a Discussion, a Locker or have your students submit files to an assignment folder. This can be created by simply editing your group category. Go to Groups and select your group category and select Edit group category. Edit the settings for your group category and click Save. Please note that these settings will apply to all the groups that fall under this group category.

How to use this to improve your course
- Do not “Publish this Enrolment in Brightspace” without having any students.
- Currently in The TU Delft Group Tool – Group Self Enrolment if you click “Publish this Enrolment in Brightspace” before all students are enroled, the group gets automatically published under “Collaboration” > “Groups” and the category type reverts from “Self-Enrolment” to “# of Groups – No Auto Enrolments”.
Need support?
Get in touch with us! We are happy to help.
- Teaching-Support@tudelft.nl
- +31 (0)15 27 84 333